StowAway Temperature Loggers Installation, Logging and Downloading
PLEASE NOTE: Although these instructions discuss the StowAway loggers, they are valid for any type of logger.
The StowAway temperature loggers come in three varieties. Each set contains one (1) logger that measures over the range of -50 to 33° C to be used to for air temperature, one (1) logger that has a temperature range of -37 to 46° C for surface temperature readings, and (4) loggers that have a temperature range of -31 to 5° C for soil temperature measurement. The range is listed on the side of the logger casing. In addition, there are (6) thermistor strings. Five of these are about 2 m long; the other is longer and is to be used for the deepest soil probe.
Our primary goal is to obtain a set of standardized, year-round time series of air and soil temperature for circumarctic sites.
Installation
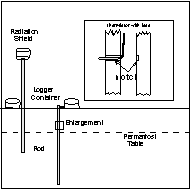
The array of loggers should be installed at a location that is representative of the study area; in many cases, it will be near the center of the grid where active layer thaw depths are measured. A small diameter (~3 cm) hole should be drilled into the ground to a depth of 2 m. I have found that it is easiest to first tape the thermistors to a wooden rod (1-2 cm diameter) at measured points along the rod; a saw can be used to cut a slot in the rod to ensure accurate positioning and prevent thermistor heave (See Figure). The rod is then inserted into the ground. The CALM protocol suggests thermistor depths at 0.5, 1.0, 1.5 and 2.0 m. You should use the four -31 to 5° C loggers for this purpose, with the long thermistor string for the deepest (2.0 m) probe.
The near-surface probe should be located at the base of the living plants-duff interface, typically 2-3 cm below the surface. It does not need to be taped to the wooden rod.
The air temperature thermistor should be placed within the radiation shield, using the small piece of tubing as a spacer. The radiation shield should be bolted to a sturdy wooden rod which is firmly embedded in the permafrost; the shield and thermistor should be 1.6 m above the ground surface (See Figure). The thermistor string should be taped to the wooden rod to prevent fraying of the wire.
If the site is secure from vandalism, all six thermistors can be located in the same place. In this case, all six loggers can fit in the container. If you need to locate the radiation shield-air temperature logger at a nearby location, use the smaller container to hold the logger. The important points here are (1) air temperature measurements are crucial to our efforts, and (2) if there is the risk of equipment loss, it is best to separate the air temperature-radiation shield unit from the five soil temperature loggers so as to minimize logger loss.
The thermistor strings enter the container through the hard rubber hose. The hose is used to protect the thermistor strings from animals, and can be buried in the ground. We have lost more data from animal gnawing than any other source, so this is a crucial consideration.
Once you have the loggers in the container and the thermistor leads pulled through the rubber hose, you can caulk the hose opening with the caulk provide. Be sure the thermistor leads are firmly plugged into the loggers, then screw on the container cap. This can be tightened using a large pair of channel locks. To make the unit completely waterproof, you should caulk around the screw-on lid. It is easy to remove with a knife when you need to download the data, and will protect the loggers if properly applied. Once the caulk is dried, you should seal the container in several plastic bags. If necessary, bury it so that animals and people can't disrupt it.
If the loggers get wet, drain them of water and slowly dry the loggers. You may have to quickly replace the battery (you have about 6 seconds before the stored data is lost), then try to download the data. If you are successful, the metal parts of the logger will need to be treated with an anticorrosion spray. Keep in mind that we will not have funds to replace many loggers, so do your best to keep the loggers dry.
Launching, Logging, and Downloading Data
You should install and test your software and loggers before going into the field. In most cases, the logger cable will utilize COM 1, and you should select this in the Settings window.
Go to the Logger menu and select Launch. Once the computer has located the logger, you can change the settings. First, set the temperature selection (Measurement Unit) to degrees C. Then give the logger a name (Description). I suggest that you use your site number (R18 for Mt. Rodinka in Kolyma, for example), and the a number or letter. Thus, it may be R18-4 for the deepest soil probe (soil probe 4), R18-A for the air temperature logger, or R18-S for the ground surface logger. The downloaded data files will also be stored with this name.
Once in the field, you will probably use the Delayed Start setting. In accordance with CALM protocol, I set my loggers to read every hour on the hour. Thus, if it is 08:39, I will set all of my loggers to begin logging at 09:00. Select a time Interval of 1 hr. Note that the duration will indicate how long you can record at a 1-hr frequency. You should record data every 1 hour if you will return to the site within the stated amount of time, or every 2 hours if you may be delayed. Do not select the wrap-around, triggered start, alarms, or multiple sampling.
You should read the StowAway XTI User's Manual for a discussion of launching the logger and the meaning of the flashing red light. Be sure that the logger is properly launched before unplugging the cable.
KEEP IN MIND THAT THE LOGGER WILL USE THE TIME SETTING FROM YOUR COMPUTER. Thus, if you changed time zones when you went to your field site, be sure to change your computer clock. When you send in your data, you should indicate your time zone (+/- GMT).
When it is time to download your data, wait until 10 minutes after the hour. This is because the clock inside the logger often slows down in winter. Open the container and begin downloading the data. It will take several minutes for each logger. Save the files as *.dtf files, where * is the file name. I always alter the name of the data file slightly to indicate the year. For example, for logger R18-4, I will call it R18-498, for data collected in 1998.
Replace the battery (see below), then launch the logger from the Logger menu. To ensure a continuous data record, use delayed launch set for the next hour. All other setting will be the same. After all loggers and been downloaded and launched, reseal the container.
Note on batteries:
Although the batteries are supposed to last 2 years, they rarely will. Instead, one year is about the limit in cold climates if you are recording every hour. If it appears that you may not revisit the site the following year, set the recording frequency to 2 hours or longer.
If the logger doesn't respond when you go to download the data, open the logger casing and quickly replace the battery. You should be able to recover the data recorded up to the time the battery was drained.
Before replacing the battery, it is important to first remove any static charge. This is done by momentarily placing a piece of metal across the electrodes before plugging the battery into the logger.
Finally, I sometimes forget if I have replaced a logger battery. For this reason, I mark all new batteries with the current year. Using a pen, I will write 98 on the battery, meaning it was installed in 1998. In this way, I will know if I replaced the battery.
Sending Data for Archiving
The *.dtf files are compressed. For this reason, it will be best if the 6 data files from your site are send to me separately as *.dtf files. However, you will have to indicate the depth associated with each file. Further instructions are available on the page for uploading data files.
I will load the *.dtf file into the StowAway software and save it as an Excel file. I will then merge the files into one large file for your site. If all of the measurements were made at the same time, this yields a very useful data record for the site. An example from Alaska is shown below:
| ObsInd | Date | Time | 200cm(C) | 150cm(C) | 100cm(C) | 50cm(C | Air(C) | Surf(C) |
| 0 | 8/6/96 | 0:00:01 | -1.22 | -0.11 | -0.26 | -0.16 | m | m |
| 1 | 8/6/96 | 1:00:01 | -1.22 | -0.11 | -0.26 | -0.16 | m | m |
| 2 | 8/6/96 | 2:00:01 | -1.22 | -0.27 | -0.42 | -0.16 | m | m |
| 3 | 8/6/96 | 3:00:01 | -1.22 | -0.27 | -0.42 | -0.16 | m | m |
| 4 | 8/6/96 | 4:00:01 | -1.22 | -0.27 | -0.42 | -0.16 | m | m |
| 5 | 8/6/96 | 5:00:01 | -1.22 | -0.43 | -0.42 | -0.16 | m | m |
| 6 | 8/6/96 | 6:00:01 | -1.22 | -0.43 | -0.42 | -0.16 | m | m |
| 7 | 8/6/96 | 7:00:01 | -1.22 | -0.43 | -0.42 | -0.16 | m | m |
| 8 | 8/6/96 | 8:00:01 | -1.22 | -0.59 | -0.42 | -0.16 | m | m |
| 9 | 8/6/96 | 9:00:01 | -1.22 | -0.59 | -0.58 | -0.16 | m | m |
| 10 | 8/6/96 | 10:00:01 | -1.22 | -0.75 | -0.58 | -0.16 | m | m |
| 11 | 8/6/96 | 11:00:01 | -1.22 | -0.75 | -0.58 | -0.16 | m | m |
| 12 | 8/6/96 | 12:00:01 | -1.22 | -0.75 | -0.58 | -0.16 | m | m |
In this example, I also included an Observation Index; "m" refers to missing data.
If you save and reformat your data in Excel, as I did above, use your StowAway software to select Excel (with commas) in your software settings. The resulting file will be very large and will take a while to send electronically, so you may prefer to send me the data on a disk.
Each year, the formatted data, site description, and thaw depths will be placed on the WWW page for your site.